Light activated police siren using 555 timer and light dependent resistor(LDR)
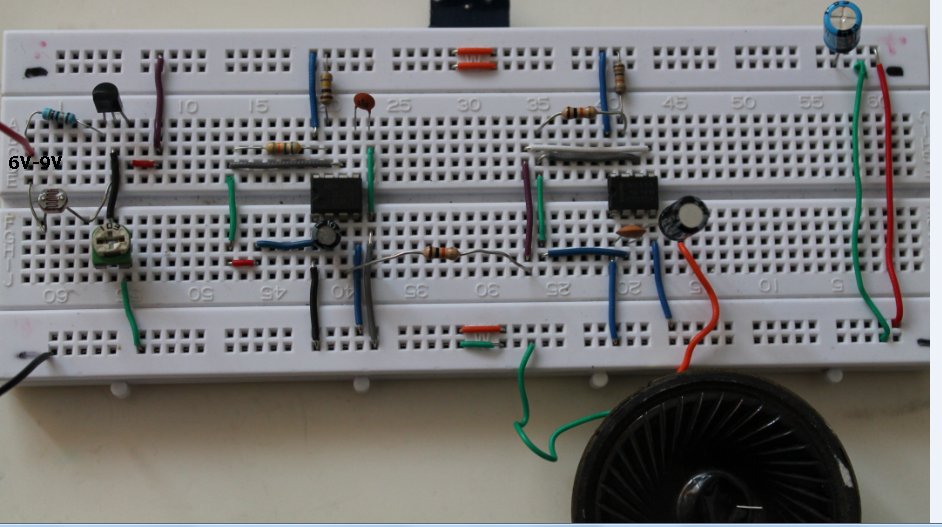
Here’s a simple light activated police siren using light dependent resistor and NE555 timer. Before you make this project, I would recommend you to make the following projects.
a. Light sensor and dark sensor
I strongly recommend you to make a dark sensor and light sensor using LDR and understand clearly how it works.
b. NE555 astable mode– Understand the working of astable mode of NE555 timer.
The police siren project is based on these two projects, so you need to understand these two projects first.
So, let’s move for the police siren project(without LDR).
Working of this project:
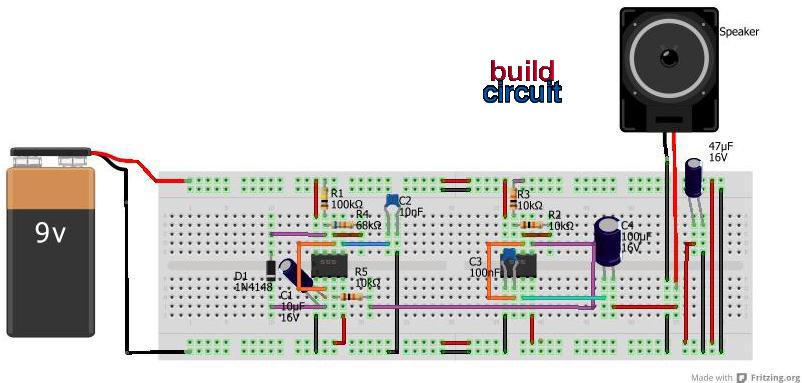
The 555 timer with R1=68K(say timer1) is configured in slow astable mode and the timer with R4=10K(say timer2) is configured in fast astable mode. By applying voltage to the Pin 5 (control voltage input), we can change the timing characteristics of the timer. In the astable mode, control voltage can vary from 1.7V to the input voltage level(i.e. 6V in this case) that produces output frequency lower or higher than the frequency produced by the network of R1, R2 and C1 for timer1 and R4, R5 and C3 for timer2. To know more about the output frequency of 555 timer, read this tutorial: ASTABLE MODE
The police siren effect is produced because of the input voltage at pin 5 of timer2. It makes the timer2 to produce frequency modulated output. In this circuit, timer1 controls the output frequency of timer2, producing police siren effect.
YOU CAN USE 6-9V power supply for this project
For the breadboard layout, follow the given configuration:
YOU CAN USE 6-9V power supply for this project.
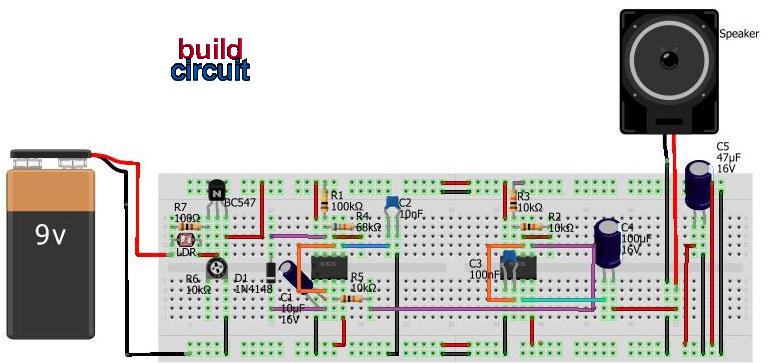
After we add a simple light sensor in this project, it becomes a light activated police siren.
Light sensor and police siren circuit:
When you put light on LDR, the police siren circuit gets power from the transistor Q1. You can change the sensitivity of the circuit by varying the resistance VR1. If you swap LDR and VR1, the circuit works in opposite way. HOW TO MAKE A LIGHT SENSOR?





Dude you are the life saver to me… i needed a small project on 55 timer…this really helped me a lot…excellent work…
Thanx a lot….. A great help to a poor fellow….
Owsum !
Hats off ,,,,,,,,,,,,,,,,,,
hello.may I ask why the circuit of the first one didn’t work?I created a pcb design of it and now I don’t know how to troubleshoot it. By the way, I used a 8ohm,5watts speaker and the battery is 8 volts.thanks.
did you test it on breadboard before you made on PCB? If it works on breadboard, then it should work on PCB also.
dude, can u tell me about its applications???
hello i want ask you can not use the ceramic capacitor ? any way why were u used 9v to the supply? thanks
Is there a substitute I can use for the 33 micro farad capacitor? I only have 22 or 47 micro farads.
can u list the component parts of this circuits? thanks…